

 Tweet
Tweet
Cornering Control:
Part 1
By David L. Hough
Biker Bob just got back into motorcycling, and his new bike seems to have a mind of its own. His new heavyweight machine doesn�t respond the same way his 250cc scrambler did 20 years ago. His scrambler would lean just by throwing his weight toward a turn. Today he�s on his way home from a ride, approaching the narrow side street where he�ll be turning off from the wide boulevard. Bob signals, rolls off the throttle, and leans the bike into a right-angle turn. But the bike doesn�t seem to want to turn as tightly as Bob wants it to.He tries leaning it a little farther by leaning his shoulders toward the right and nudging his left knee against the tank, but the front wheel continues to roll wide, across the centerline. Fortunately, the driver of a car coming up the street sees the bike, and brakes to avoid a collision. It�s embarrassing not being able to control the bike as accurately as he�d like. Bob is not alone. Lots of motorcyclists haven�t figured out how to steer a bike accurately, especially a big bike at slower speeds.
The action is down at the front tire contact patch
It�s very important to understand that accurate two-wheeler steering is a matter of pushing on the handlebar grips, not just leaning weight in the saddle. Obviously, a bike needs to lean toward the curve in order to turn. And you can make it lean just by shifting your weight in the saddle, or nudging the tank with your knees. But the easiest and most accurate way to control lean is by momentarily steering the front wheel opposite the way you want to go. The out-tracking of the front tire forces the bike to lean. To turn left, press on the left grip. To lean and turn right, momentarily press on the right grip. It�s called "countersteering".
That momentary push on the grips is just the first part of a process of balancing and steering a motorcycle. That initial input is called "countersteering" because you momentarily steer the front wheel opposite, or "counter" to the direction you want to go. But as the bike leans over to the angle you need to make the corner, you allow the front wheel to recenter, and even steer slightly toward the curve. Leaned over, front tire traction forces the bike to turn. The bike is held at the same lean angle by gravity being balanced against centrifugal force.
Pressing the grips right causes the front
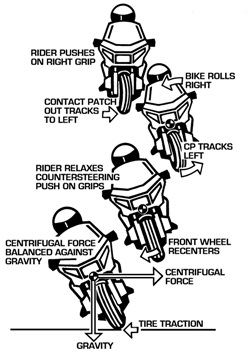 wheel to track left, and tire traction forces the motorcycle to lean toward the right.
This process repeats over and over again as a rider makes adjustments to balance and direction. Front end geometry also contributes to balance--the front wheel keeps trying to recenter itself with the bike vertical. But even in a "straight" line, the front wheel weaves slightly from side to side as the bike�s geometry and the rider�s steering input work together to control balance and direction.
Countersteering is just the first part of the cornering process. As the bike rolls over to the angle of lean you think is about right for the corner, you allow the front wheel to recenter. The front tire pushing the bike toward the turn generates "centrifugal force". The bike is kept from falling over by centrifugal force balanced against gravity.
In a turn, you can control the direction of the bike by small adjustments to steering. To turn a little tighter, push the grips a little more toward the curve. That�s what Bob needed to do to avoid crossing the centerline and staying within his lane. Press right to lean right. And what Bob needed to avoid those parked cars on his right is to lean a little more left. Press left to lean left.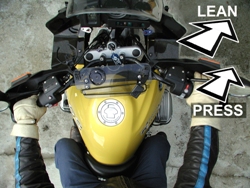 It might seem easy enough to countersteer, but sometimes a rider�s brain subconsciously confuses the issue, signaling the left and right hands to do different things. It�s not uncommon for a rider to be pushing on one grip to lean the bike, and subconsciously resisting that push with the other hand. If it sometimes seems that your bike just doesn�t want to lean even when you are pressing hard toward the direction of turn, it�s a hint you need to get your hands coordinated.
In simple terms, pressing on the right grip causes the bike to lean (and turn) right.
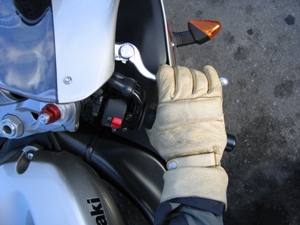
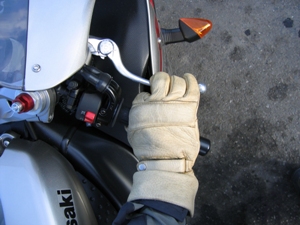
Lee Parks, author of the book Total Control, suggests steering with one hand. That is, in a right turn, do the countersteering with your right hand. In a left turn, steer with your left hand. What�s important is to make a point of relaxing the other arm, to ensure that you aren�t subconsciously strong-arming the opposite grip and resisting your "steering" hand. For instance, when turning left, steer with your left hand, and relax your right arm. In a right turn, relax your left arm. If you�re having trouble only with left-hand turns, it may be because you�re strong-arming the right grip as you manage the throttle. Try flapping your elbow a bit to help relax the "non-steering" arm.
Or, you might try concentrating on moving both grips toward the direction of turn. That is, leaning into a right turn, consciously press both grips toward the right. You might actually be pushing on the right grip and pulling on the left grip, but you can imagine that it�s moving the grips toward the curve that pushes the bike over. Press both grips toward the right to lean right. Press both grips left to lean left. It�s OK to lean body weight toward the
 curve while holding onto both grips. Leaning pulls both grips toward the curve, which is actually countersteering, but focusing on leaning can smooth out the steering input.
 Or, try moving both grips toward the turn. You might actually be pushing on the right grip and pulling on the left grip, but you can imagine that it�s moving the grips toward the curve that pushes the bike over. Its OK to lean your body toward the curve.
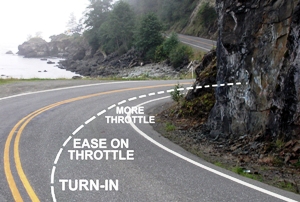
It�s not just countersteeringWhile countersteering is the basic technique for accurate steering control, there are some other considerations when cornering, including your cornering line, where you�re placing your weight on the bike, and what you�re doing with the brakes and throttle.
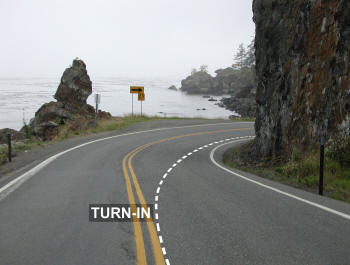 The best way to maximize the view is to enter corners from the “outside” of the turn. That is, approaching a right-hander, make your turn-in from a position closer to the centerline.
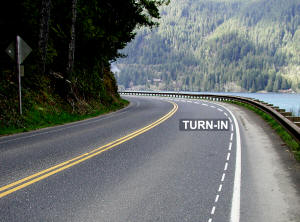 For a left-hander, make your turn-in closer to the right edge of the pavement.
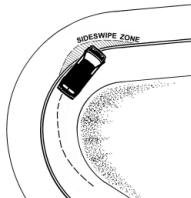 those areas. Consider how an oncoming driver sees the road. There is a tendency to enter curves too fast, cut toward the inside too early, then drift wider in the last half of the curve.
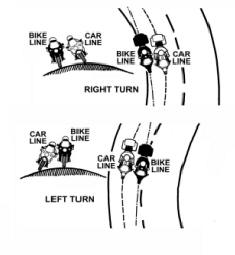 The “bike” line keeps the motorcycle more vertical, especially on crowned roads.
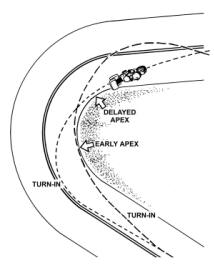 The problem with an early apex is that it points the bike “wide” in the last half of the curve.
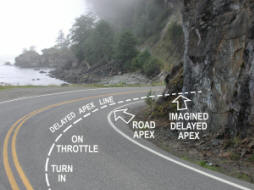 provides a better view ahead, conserves traction during the last half of the turn, keeps you away from those “sideswipe zones,” and points the bike more around the curve. A delayed apex line is a good idea for riding public roads where anything can happen.
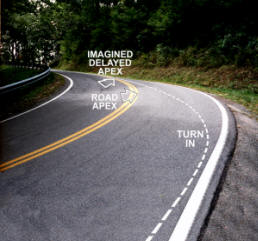 the actual road apex might be. A delayed apex line works just as well in a left turn, with your imagined apex along the centerline, a little farther around the turn.
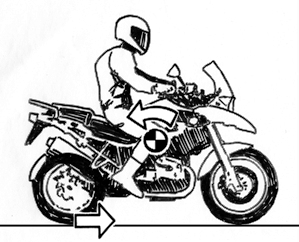 In a corner, it would be best to maintain the weight distribution on the tires. Even if the bike is in a straight line, rolling on the throttle tends to shift weight onto the rear wheel. Rolling off the throttle shifts weight toward the front. That same front-rear weight shift occurs in a corner. To maintain traction, it would be best to maintain weight distribution while leaned over.
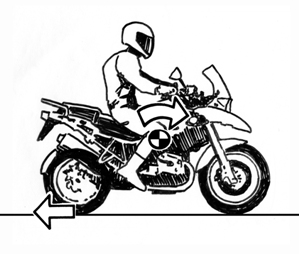 Let’s note that even if the tires don’t seem to be sliding sideways on the pavement during a curve, they are. In a curve, the flexible tire rubber allows the bike to move in a slightly different direction from where the wheels are pointed. It’s called "drift," or more correctly "side slip." Rolling on a bit more throttle tends to increase the slip angle of the rear wheel, pointing the bike more toward the curve.
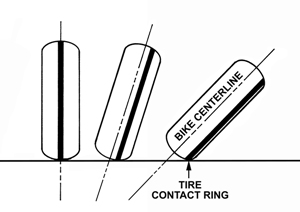
 You can practice smooth throttle and brake application in a straight line exercise. At a speed of say, 40 mph, ease the throttle closed as you progressively squeeze on the front brake. Don’t clutch or shift down. As the bike decelerates to about 20 mph, ease off the brake as you smoothly roll back on the throttle. The goal is to transition from throttle to brakes and back to throttle so smoothly that the bike isn’t upset.
 You can expect surface traction to change, even during a corner. A patch of sand or dribble of diesel oil will reduce traction, and you can feel a momentary slip of either or both tires. The typical (and wrong) "survival reaction" when a rider feels a tire slip sideways is to snap the throttle closed, but that can turn a short slide into a major crash. If the tire can regain traction, it will. It’s difficult to resist the urge to snap off the throttle, but it’s important to hold a steady throttle and steer toward the direction of the skid.
Comment